Why the ceramic POD?
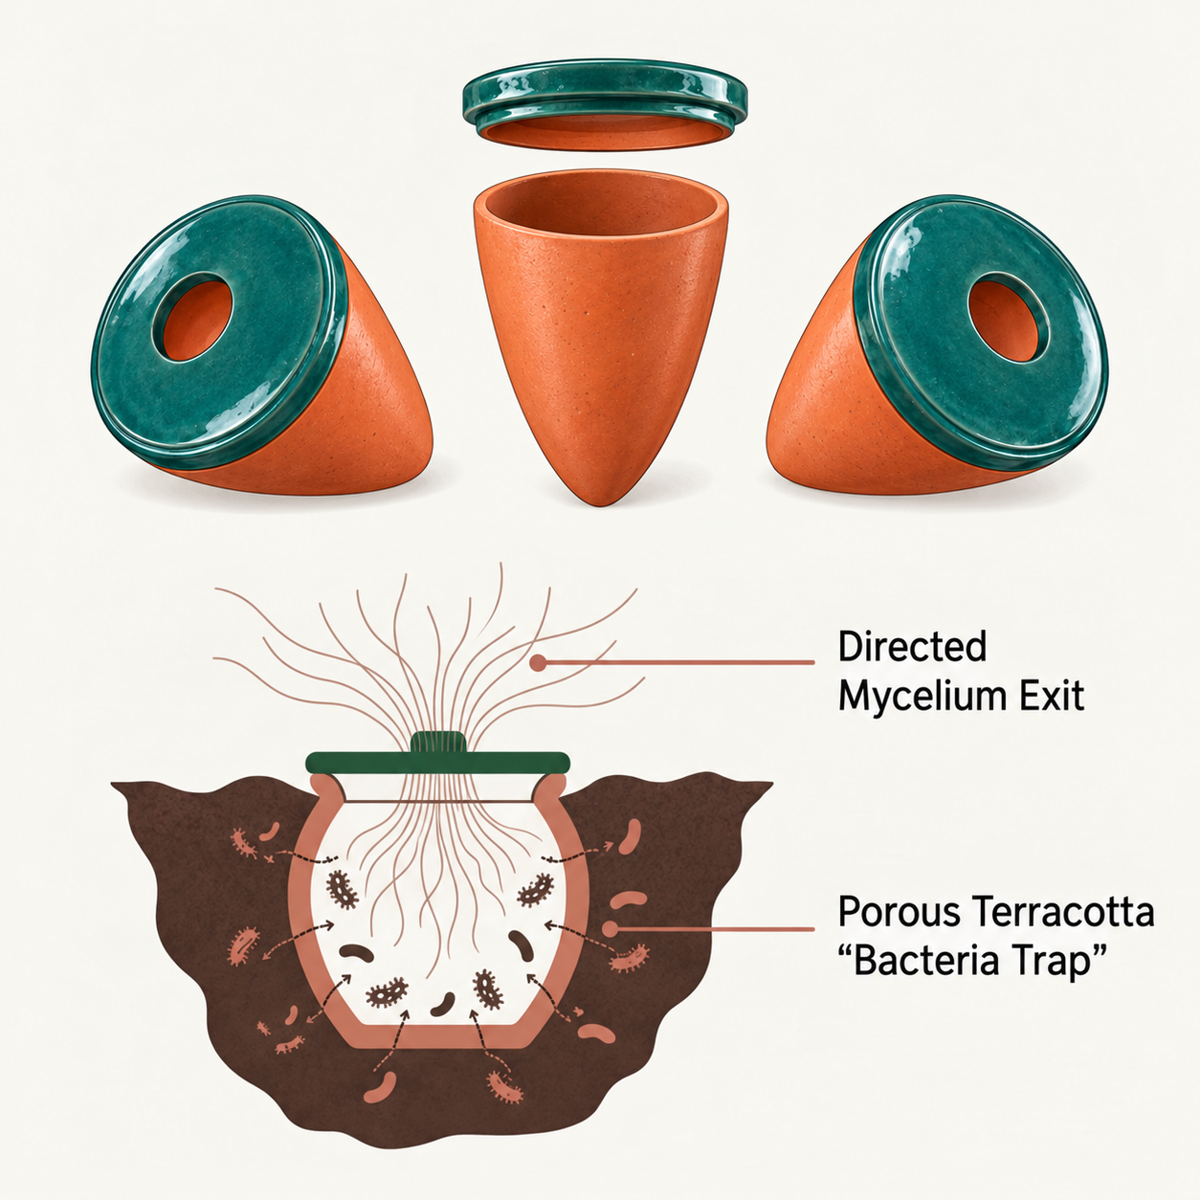
The Ceramyca approach gives morel mycelium a designated starting point inside a reusable terracotta POD. Its porous wall supports contact with the soil’s microbial life, while the lid directs growth out into the prepared bed.
Gardener POD
The guide describes this as an autonomous system that does not require external feeding. Follow the instructions supplied with your Gardening Kit.
POD Pro
Designed for larger growing systems, this version uses additional nutrient inputs during incubation. The feeding stage below applies to POD Pro.
The Serre-Flex shelter supports the growing environment through weather protection, humidity management, and approximately three-quarter shade, recreating woodland-edge light.
Start with suitable conditions.
Test the soil
The guide specifies a mineral pH measured in KCl of 8. Use calcium carbonate to correct acidity according to your soil assessment; avoid quicklime and slaked lime.
Choose compatible materials
Avoid inhibitory substrates such as conifer material, walnut residues, sage, and fresh wood chips. Use well-composted hardwood material instead.
Plan your water source
The guide calls for fresh surface water and excludes chlorinated tap water and hard water. Confirm a suitable supply before preparing beds.
Protect microbial life
Choose a site free of chemical inputs and antifungal treatments. This system relies on relationships between mycelium and beneficial bacteria.
A cool-season growing cycle.
The guide’s calendar places sowing in October–December and harvest in February–May. Treat these as a seasonal example: local temperature and climate determine when your beds are ready.
| Stage | What to monitor |
|---|---|
| Spawn storage | 36–39°F (2–4°C) |
| Sowing | Air temperature below 68°F (20°C) |
| Incubation | At least 1.5 months; the example cools from 68°F to 55°F (20°C to 13°C) |
| Vernalization | At least 1.5 months; the example cools from 55°F to 41°F (13°C to 5°C) |
| Fruiting & harvest | Soil at 4 inches (10 cm): 45–59°F (7–15°C); air up to 68°F (20°C) |
The guide specifies three-quarter shade and tunnel temperature limits of about 18–82°F (−8 to +28°C). Measure conditions in the actual growing environment.
Prepare and inoculate the soil.
Prepare ridged growing strips about 2.6–4.9 feet (0.8–1.5 m) wide. Leave a cloddy structure, with soil aggregates approximately the size of an egg.
- Incorporate hardwood compost aged at least two years into the top 4–6 inches (10–15 cm).
- The guide recommends 20 liters per square meter for an initial setup, increasing to 40 liters per square meter when organic matter is below 5%.
- The day before sowing, introduce the prescribed Pseudomonas putida probiotic amendment through generous watering.
Terracotta PODs provide a surface for the bacterial relationships central to this growing approach. Confirm the amendment and protocol for your setup with Ceramyca.
Sow the PODs and observe incubation.
- Ensure the soil is saturated before sowing.
- Break up the mycelium in its bag and fill PODs generously, without compacting it.
- Arrange the PODs in a staggered pattern appropriate to your growing bed.
- Cover them with about ¾–1¼ inches (2–3 cm) of soil to form a level surface.
- Protect the strip with the tunnel and incubation textile specified for your system.
Under suitable conditions below 68°F (20°C), surface mycelium may appear above the PODs in less than a week. The guide describes growth areas reaching about 6–8 inches (15–20 cm) in diameter after 10–15 days.
Maintain soil moisture. During this stage, water the pathways if needed rather than watering the cultivation bed directly.
Feed the expanding mycelium.
For POD Pro, begin feeding when the growth areas around two adjacent PODs reach approximately 6–8 inches (15–20 cm) in diameter. The guide gives a typical feeding window of 7–10 days after placement; observe growth rather than relying only on elapsed time.
- Use one 3-liter bag of sterilized grain to nourish two PODs.
- Position the bag so it bridges the two growth areas.
- The guide specifies an opening roughly the size of a €2 coin, about 1 inch across, at each end on the soil-facing side.
- These contact points connect the grain supply with the expanding mycelial network.
This is the professional feeding protocol. Gardener PODs are described separately and do not require these external nutrient bags.
Build reserves through vernalization.
During the cold season, the mycelium converts available nutrition into sclerotia: dense reserves that support later fruiting. The guide describes this stage lasting 1.5–4 months, depending on climate.
White growth areas may become orange-brown after consuming the available nutrients. In the guide, this color change signals the start of nutrient conversion and sclerotia formation. Continue observing moisture and temperature through this slower phase.
Recognize the conditions for fruiting.
The guide brings together three factors: available sclerotia, warming soil, and the light response under three-quarter shade.
- Measure soil temperature each morning at about 4 inches (10 cm) deep.
- Watch for temperatures consistently reaching 45°F (7°C), within the 45–59°F (7–15°C) fruiting range.
- At this point, the guide calls for saturation watering, with puddles forming in the pathways.
Combined with rising temperatures, this watering initiates the conditions for primordia—the first small developing morels.
Match watering to the growth stage.
| Development | Care |
|---|---|
| Primordia & young morels under ¾ inch (2 cm) | Do not water directly. Water the pathways so moisture reaches the bed by capillarity. |
| Growing morels around ¾–1½ inches (2–4 cm) | The guide allows direct watering during this growth stage. |
| Maturing morels | Use sprinklers in short, early-morning sessions. |
Protect the bed from drying winds and crust-forming rain with a fruiting tarp over a small tunnel. Water early in the morning to reduce thermal shock.
Harvest with care.
The guide recommends cutting when morels are approximately 4–4¾ inches (10–12 cm) tall, including the stem. Look for a creamy white stem and cap pits that open around the middle while remaining closed at the top.
- Cut the mushroom; do not pull it from the bed.
- Avoid harvesting just after watering or rainfall. The guide associates this with reduced quality and red-stem problems.
- Arrange prompt shipping after harvest.
- Pack to prevent movement and breakage during transit.
Read the signs in your bed.
Use visible changes as prompts to inspect moisture, temperature, soil conditions, and potential pests.
| What you see | What to investigate |
|---|---|
| Cap damage or feeding marks | Mushroom flies or slugs; inspect the crop for pest activity. |
| Damage around the stem base | Nematodes or springtails. |
| Red stems | Excess water or harvesting after rain; the guide identifies cyanobacteria as a concern. |
| Decomposition on a stressed morel | The guide identifies Dactylium dendroides as a possible decomposer. |
| “Cathedral” stem form | Soil pH issues or substances inhibiting growth. |
| Cracked caps or drying heads | Frost damage or excessive heat, respectively. |
For crop problems, share your observations with the cooperative before choosing an intervention.
Plan for your growing conditions.
Bring your climate, soil assessment, water source, and growing goals to the cooperative. Together, choose the right POD system and seasonal plan.
Source: Morel Cultivation Mastery: A Probiotic System, supplied Ceramyca cultivation guide, pages 1–15. Fahrenheit and imperial measurements are rounded equivalents of the guide’s metric values.